Guide to Transport Management in cutebrains School Management System
The cutebrains School Management System includes a transport management section where you can view and manage details of all transport vehicles used by the school, such as school buses. This guide will help you understand how to navigate the transport section, view transport details, and manage various operations related to school transport, including exporting details, managing fees, and editing vehicle information.
Step-by-Step Guide
Accessing the Transport Management Page
- Login: Log into your cutebrains School Management System account.
- Navigate to Transport: Click on the “Transport” icon on the dashboard to access the transport management section.
Viewing Transport Vehicles
- Transport List:
- The transport management page displays a list of all transport vehicles used by the school.
- Each entry includes details such as plate number, bus name, bus number, vehicle category (senior/junior), driver name, driver license, notes, and operations.
- Search:
- Use the search bar to find specific vehicles by entering keywords related to the vehicle’s details.
Managing Transport Operations
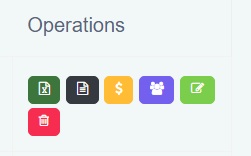
The operations menu provides several options to manage the transport details for each vehicle:
- Export to Excel:
- Click the green Excel icon to export the details of the bus, including all member details, to an Excel file.
- Bulk Students Fees:
- Click the black document icon to manage bulk student fees related to the transport vehicle.
- Allocate Fees:
- Click the yellow dollar icon to allocate transportation fees for the vehicle.
- View Members:
- Click the purple group icon to view members (students) assigned to the vehicle.
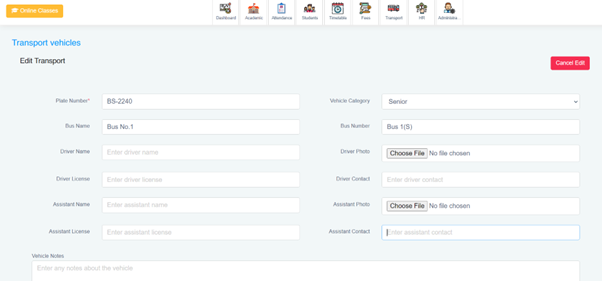
- Edit:
- Click the green pencil icon to edit the vehicle details.
- Remove:
- Click the red trash icon to delete the vehicle from the list.
Additional Actions
- Add Vehicle:
- Click on the green “Add Vehicle” button to add a new transport vehicle to the list.
- Fill in the necessary details such as plate number, bus name, bus number, vehicle category, driver name, and driver license.
- Allocate Fees:
- Click on the yellow “Allocate Fees” button to allocate transportation fees to students using a particular vehicle.
- Transportation Config:
- Click on the black “Transportation Config” button to configure various transportation settings and parameters.
The transport management section in the cutebrains School Management System provides a comprehensive solution for managing school transport vehicles. By following this guide, you can efficiently view, manage, and update transport details, ensuring smooth and safe transportation for students. For any additional assistance, the cutebrains support team is available to help.

Guide to Transport Management in cutebrains
The cutebrains School Management System includes a transport management section where you can view and manage details of all transport vehicles used by the school, such as school buses. This guide will help you understand how to navigate the transport section, view transport details, and manage various operations related to school transport, including exporting details, managing fees, and editing vehicle information.
Step-by-Step Guide
Accessing the Transport Management Page
- Login: Log into your cutebrains School Management System account.
- Navigate to Transport: Click on the “Transport” icon on the dashboard to access the transport management section.
Viewing Transport Vehicles
- Transport List:
- The transport management page displays a list of all transport vehicles used by the school.
- Each entry includes details such as plate number, bus name, bus number, vehicle category (senior/junior), driver name, driver license, notes, and operations.
- Search:
- Use the search bar to find specific vehicles by entering keywords related to the vehicle’s details.
Viewing and Managing Members
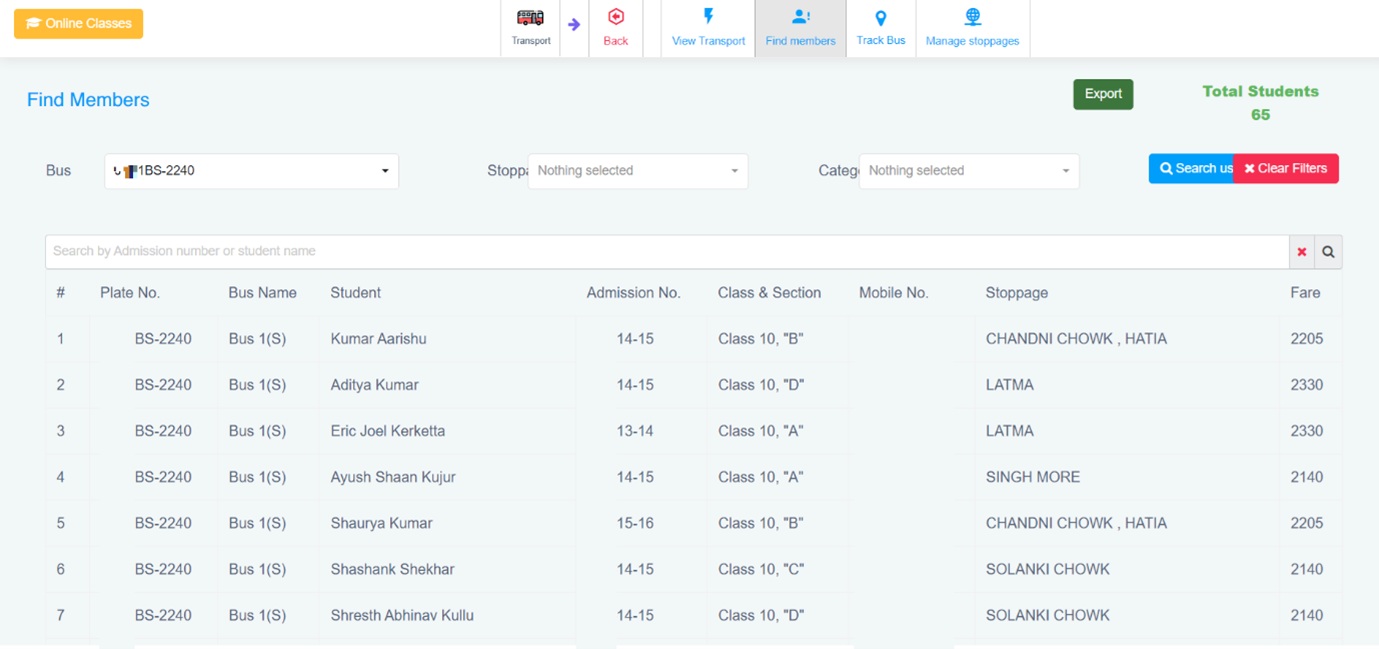
- Find Members:
- Navigate to the “Find Members” section to view students assigned to specific buses.
- Use the “Bus” selector to choose the bus you want to view.
- Optionally, filter by stoppage and category.
- Member Details:
- The list displays details such as plate number, bus name, student name, admission number, class & section, mobile number, stoppage, and fare.
- Search and Export:
- Use the search bar to find specific students by admission number or name.
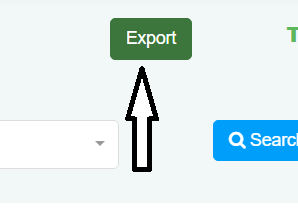
- Click on the green “Export” button to export the list of members to an Excel file.
The transport management section in the cutebrains School Management System provides a comprehensive solution for managing school transport vehicles. By following this guide, you can efficiently view, manage, and update transport details, ensuring smooth and safe transportation for students. For any additional assistance, the cutebrains support team is available to help.
Guide to Managing Stoppages in cutebrains
The cutebrains School Management System allows for efficient management of transport stoppages. This guide will help you understand how to view, add, and manage stoppages, ensuring students are assigned to the appropriate bus routes based on their application requests.
Accessing the Manage Stoppages Page
- Login: Log into your cutebrains School Management System account.
- Navigate to Manage Stoppages: Click on the “Manage stoppages” option on the dashboard to access the stoppage management section.
Viewing Stoppages
- Stoppage List:
- The stoppage management page displays a list of all transport stoppages.
- Each entry includes details such as the stoppage ID, transport title, fare, pin/zip code, locations, and operations.
- Search:
- Use the search bar to find specific stoppages by entering keywords related to the stoppage details.
Managing Stoppage Operations
The operations menu provides several options to manage stoppage details:
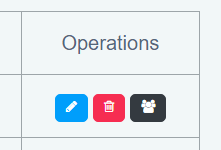
- Edit Stoppage:
- Click the blue pencil icon to edit the stoppage details.
- Remove Stoppage:
- Click the red trash icon to delete the stoppage from the list.
- View Online Applications:
- Click the black group icon to view online applications related to the stoppage.
Adding a New Stoppage
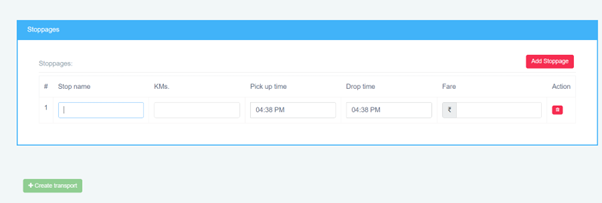
- Add Stoppage:
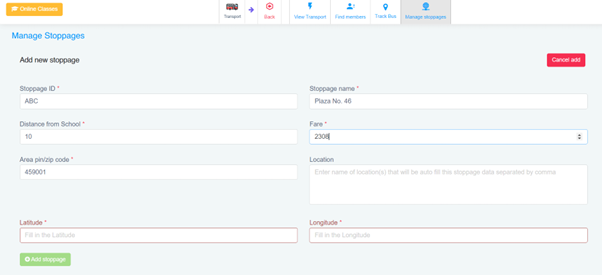
- Click on the green “Add Stoppage” button to add a new transport stoppage.
- Fill in Stoppage Details:
- Stoppage ID: Enter the ID/Code of the stoppage.
- Stoppage Name: Enter the name of the stoppage.
- Distance from School: Enter the distance of the stoppage from the school in kilometers.
- Fare: Enter the fare amount for the stoppage.
- Area Pin/Zip Code: Enter the pin/zip code of the stoppage area.
- Location: Enter the location(s) that will be auto-filled for this stoppage.
- Latitude: Enter the latitude coordinate of the stoppage.
- Longitude: Enter the longitude coordinate of the stoppage.
- Save Stoppage:
- Click on the green “Add stoppage” button to save the new stoppage.
Allocating Stoppages to Buses
- New Stoppage Requests:

-
- When a student applies for a stoppage, and the stoppage is new, it can be added through the “Manage Stoppages” page.
- The new stoppage will then be added to the nearest bus route running.
The stoppage management section in the cutebrains School Management System provides a comprehensive solution for managing transport stoppages. By following this guide, you can efficiently view, add, and update stoppage details, ensuring smooth and safe transportation for students. For any additional assistance, the cutebrains support team is available to help.
Guide to Online Transport Applications in cutebrains
The cutebrains School Management System provides a streamlined process for managing online applications for school transport services. This guide will help you understand how to view, approve, and allocate transport to students who have applied online for school bus services.
Accessing Online Applications
- Login: Log into your cutebrains School Management System account.
- Navigate to Manage Stoppages: Click on the “Manage stoppages” option on the dashboard.
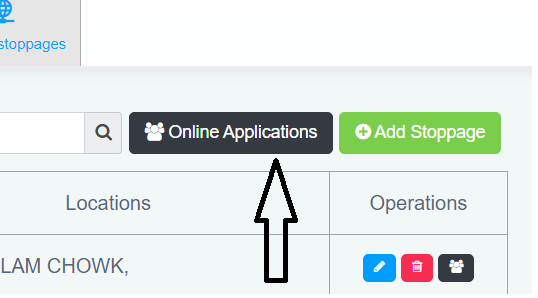
- View Online Applications: Click on the “Online Applications” button to access the list of online stoppage applicants.
Viewing Online Stoppage Applicants
- Applicant List:
- The page displays a list of students who have applied for transport services.
- Each entry includes details such as student name, class, section, contact number, requested stoppage, bus, pin/zip code, nearest location, and operations.
- Search:
- Use the search bar to find specific applications by entering keywords related to the student or stoppage details.
Managing Online Applications
The operations menu provides several options to manage each application:
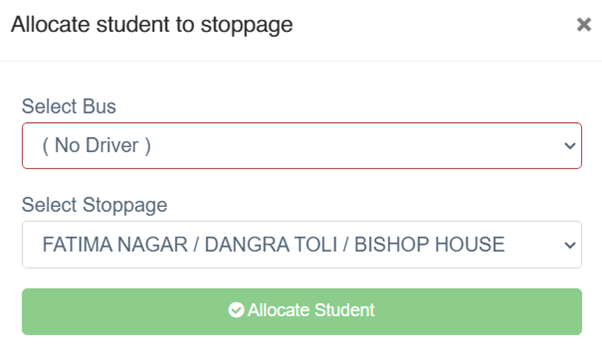
- Allocate Bus:
- Click the yellow button to allocate a bus to the student for the selected stoppage.
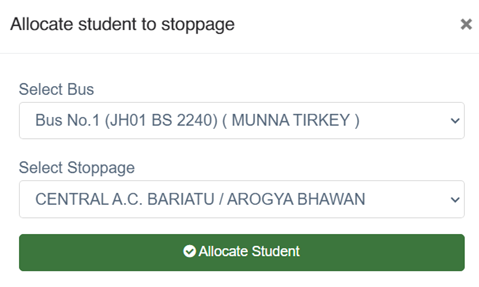
- A popup will appear where you can select the bus and confirm the stoppage.
- Click “Allocate Student” to finalize the allocation.
- Approve Application:
- Click the green checkmark to approve the student’s application for transport services.
- Once approved, the transport fees will be automatically added to the student’s fee invoice.
- Reject Application:
- Click the red cross to reject the application.
- Remove Application:
- Click the black trash icon to delete the application from the list.
Allocating Student to Stoppage
- Select Bus and Stoppage:
- In the popup window, use the “Select Bus” dropdown to choose the appropriate bus.
- Confirm the selected stoppage in the “Select Stoppage” field.
- Finalize Allocation:
- Click on the green “Allocate Student” button to allocate the student to the bus and stoppage.
The online application management section in the cutebrains School Management System provides a comprehensive solution for processing transport service requests. By following this guide, you can efficiently view, approve, and allocate transport services to students, ensuring smooth and safe transportation. For any additional assistance, the cutebrains support team is available to help.


Guide to Applying for Transport in cutebrains School Management System
The cutebrains School Management System allows students to apply for school transport services. This guide will help you understand how to fill out and submit the transport application form, as well as important notes to consider during the application process.
Step-by-Step Guide
Accessing the Transport Application Form
- Login: Log into your cutebrains School Management System account.
- Navigate to Apply for Transport: Click on the “Apply for Transport” option on the dashboard to access the transport application form.
Filling Out the Application Form
- Enter Guardian Number:
- In the field labeled “Guardian Number,” enter the guardian’s contact number. This field is mandatory.
- Enter Student Admission Number:
- In the field labeled “Student Admission No.,” enter the student’s admission number (e.g., 216-24-25). This field is mandatory.
- Submit the Form:
- Click on the “Apply for Transport” button to submit the application.
- Download Acknowledgment:
- After submitting the application, download the acknowledgment form for your records.
Editing or Printing the Applied Form
- Edit/Print Applied Form:
- If you need to make changes to the submitted application or print it, click on the “Edit/Print Applied Form” button.
Important Notes
- Acknowledgment:
- You must download the acknowledgment after submitting the application.
- Approval:
- Allotment of transport is subject to approval by the school authority.
- Stoppage Selection:
- You need to select the stoppage only from the ones available in the list.
- Queries:
- In case of any queries, call the provided contact number: 6206033670.
Applying for school transport through the cutebrains School Management System is straightforward. By following this guide, students can easily fill out and submit their transport application forms. Remember to download the acknowledgment after submission and ensure all details are entered accurately. For any additional assistance or queries, refer to the provided contact information.

Apply for Transport
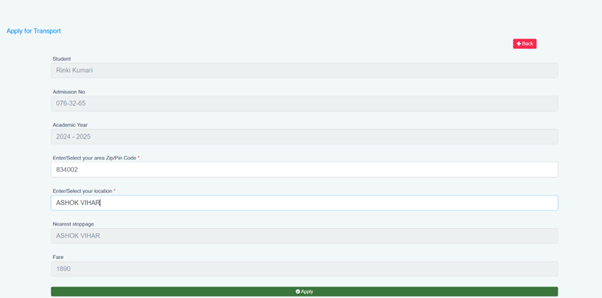
The “Apply for Transport” page is designed for students to apply for school transport services. The form requires the following information:
- Student: Automatically filled with the name of the student applying for transport.
- Admission No: Automatically populated with the student’s admission number.
- Academic Year: Indicates the academic year for which transport services are being requested.
- Enter/Select your area Zip/Pin Code: Requires the student to enter or select their area pin code.
- Enter/Select your location: Requires the student to enter or select their specific location.
- Nearest stoppage: Automatically filled with the nearest bus stoppage based on the entered location.
- Fare: Automatically calculated based on the location and displayed.
Once the form is filled out, the user can click the Apply button to submit their application for school transport services. If the user decides not to proceed with the application, they can use the Back button to return to the previous page.
Students can access the **Apply for Transport** page through the school’s website. This page allows them to submit a request for school transportation by entering necessary details such as their area zip/pin code, location, and nearest stoppage. Once the application is submitted, it will be reviewed and approved by the school administration, and a bus stoppage will be assigned accordingly. This streamlined process helps ensure students are allocated to the appropriate transportation services efficiently.
Approval and Bus Stop Allocation Process
- Approval by School:
- Once the transport application is submitted by the student, it goes under review by the school administration. The approval status is updated in the system, and the student is notified accordingly.
- Bus Stoppage Allocation:
- After approval, the school assigns a bus stoppage to the student. The allocation process involves selecting a bus and a corresponding stoppage.
- The system presents options to select the bus and stoppage from predefined lists. If no driver is assigned to a bus, it is indicated in the selection.
- The final step involves confirming the allocation, after which the student is assigned to the selected bus stoppage for their daily commute.
This process ensures that all transport requests are managed systematically, providing a structured way for students to access school transportation services.

