Class Timetable Management
The Class Timetable management feature is designed to help schools efficiently organize and manage their schedules for different classes. Here is a detailed guide on how to use the Class Timetable section effectively.
Viewing and Managing Class Timetables
- Navigate to the Timetable Section:
- From the dashboard, click on the “Timetable” tab to access the class timetable management page.
- Select Class and Section:
- Use the drop-down menus to select the desired class and section. This allows you to view the specific timetable for that class and section.
- Viewing Timetable:
- Once you have selected the class and section, click on the “Get Timetable” button to display the current timetable for the selected class.
Adding and Editing Timetable Entries
- Adding a New Timetable Entry:
- To add a new entry to the timetable, click on the green “+” button located in the time slot where you want to add the new class.
- A new dialog box will appear where you can fill in the details such as subject, teacher, and time.
- Editing Existing Entries:
- To edit an existing entry, click on the blue pencil icon located within the time slot you wish to edit.
- Make the necessary changes in the dialog box that appears and save your changes.
- Deleting Entries:
- To delete an entry, click on the red minus icon within the time slot you want to remove.
- Confirm the deletion when prompted.
Managing Breaks
- Adding Breaks:
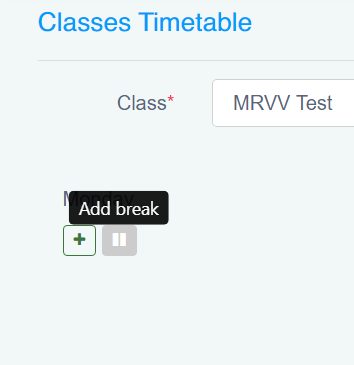
- Breaks can be added by clicking on the “||” icon next to the day name (e.g., “Monday”). A new break slot can be added by clicking the “Add Break” button as shown in the image below.
- Specify the start and end time of the break and save.Deleting Breaks:
-
- To delete a break, click on the red minus icon next to the break time.
- Confirm the deletion when prompted.
Importing and Exporting Timetables
- Importing Timetable:
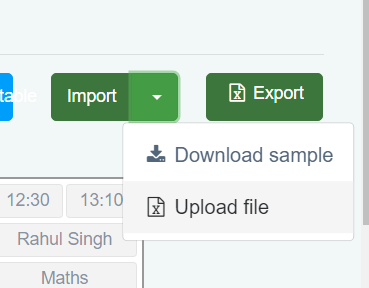
- To import a timetable from an external file, click on the “Import” button and select “Upload File”.
- Choose the file from your computer and upload it. The timetable will be populated based on the data in the file.
- Exporting Timetable:
- To export the current timetable, click on the “Export” button. You can choose to export the timetable in Excel format.
- This feature allows you to save and print the timetable for offline use.
- Downloading Sample File:
- If you need a template to prepare your timetable for import, click on “Download Sample” under the Import section. This provides a sample file that you can use to format your timetable data correctly.
The Class Timetable management feature provides a comprehensive solution for schools to organize their schedules efficiently. By allowing easy viewing, editing, importing, and exporting of timetables, schools can ensure a smooth and well-structured timetable for all classes and sections.
This feature aims to streamline the scheduling process, making it easier for administrators to manage class schedules and ensure that both students and teachers are aware of their daily activities.

Uploading Timetables in Cutebrains
To streamline the process of setting up and managing class schedules, the Cutebrains platform allows users to upload timetables in Excel format. This feature simplifies the process, making it efficient and user-friendly.
Step-by-Step Process:
- Prepare the Timetable:
- Download Sample Template: Start by downloading the sample Excel template from the platform. This template ensures that your data is in the correct format for uploading.
- Fill in the Timetable Details: Using the sample template, fill in the class schedule details, including subjects, teacher names, and time slots for each day of the week.
- Upload the Timetable:
- Navigate to the Timetable Section: In the Cutebrains platform, go to the relevant section where you manage timetables.
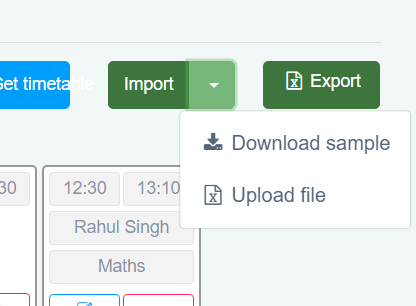
- Select ‘Import’: Click on the ‘Import’ button and choose ‘Upload file’ from the dropdown menu.
- Upload the Excel File: Select the filled-out Excel file from your device and upload it to the system.
- Review and Save:
- Check the Uploaded Data: Once uploaded, review the timetable data to ensure accuracy. The system may display the timetable for a final check.
- Save the Timetable: After verifying the details, save the timetable in the system. The timetable will now be available for the relevant classes and teachers.
Additional Tips:
- Ensure that the Excel file follows the template format to avoid errors during upload.
- Include all necessary information, such as subject names, teacher names, and time slots, to ensure a comprehensive schedule.
- After uploading, you can still make manual adjustments directly in the platform if needed.
This feature allows schools to efficiently manage and update class schedules, ensuring that both teachers and students have access to accurate and up-to-date information.

Institution Timetable (Class-Wise) Management
The Institution Timetable (Class-Wise) feature is designed to help schools organize and manage their schedules for different classes across the institution. Here is a detailed guide on how to use this section effectively.
Viewing and Managing Institution Timetable
- Navigate to the Timetable Section:
- From the dashboard, click on the “Timetable” tab to access the institution timetable management page.
- Select “Institution Timetable (Class-Wise)” from the options available.
- Select Class and Section:
- Use the drop-down menus to select the desired class and section. This allows you to view the specific timetable for that class and section.
- Click the “Get Timetable” button to load the timetable.
Viewing Timetable
- Filter and View Timetable:
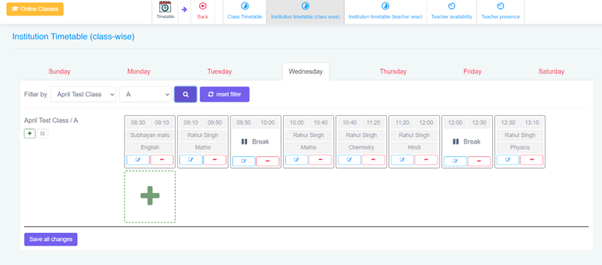
- Use the “Filter by Class” and “Section” drop-down menus to filter the timetable by the desired class and section.
- Click on the search icon to apply the filter and view the timetable.
Adding and Editing Timetable Entries
- Adding a New Timetable Entry:
- To add a new entry to the timetable, click on the green “+” button located in the time slot where you want to add the new class.
- A new dialog box will appear where you can fill in the details such as subject, teacher, and time.
- Editing Existing Entries:
- To edit an existing entry, click on the blue pencil icon located within the time slot you wish to edit.
- Make the necessary changes in the dialog box that appears and save your changes.
- Deleting Entries:
- To delete an entry, click on the red minus icon within the time slot you want to remove.
- Confirm the deletion when prompted.
Managing Breaks
- Adding Breaks:
- Breaks can be added by clicking on the “+” icon next to the day name (e.g., “Monday”).
- A new break slot can be added by clicking the “Add Break” button.
- Specify the start and end time of the break and save.
- Deleting Breaks:
- To delete a break, click on the red minus icon next to the break time.
- Confirm the deletion when prompted.
Importing and Exporting Timetables
- Importing Timetable:
- To import a timetable from an external file, click on the “Import” button and select “Upload File”.
- Choose the file from your computer and upload it. The timetable will be populated based on the data in the file.
- Exporting Timetable:
- To export the current timetable, click on the “Export” button. You can choose to export the timetable in Excel format.
- This feature allows you to save and print the timetable for offline use.
- Downloading Sample File:
- If you need a template to prepare your timetable for import, click on “Download Sample” under the Import section. This provides a sample file that you can use to format your timetable data correctly.
Additional Features
- Save All Changes:
- After making any additions or edits to the timetable, click on the “Save all changes” button to ensure all updates are saved.
The Institution Timetable (Class-Wise) management feature provides a comprehensive solution for schools to organize their schedules efficiently. By allowing easy viewing, editing, importing, and exporting of timetables, schools can ensure a smooth and well-structured timetable for all classes and sections.
This feature aims to streamline the scheduling process, making it easier for administrators to manage class schedules and ensure that both students and teachers are aware of their daily activities.
Institution Timetable (Teacher-Wise) Management
The Institution Timetable (Teacher-Wise) feature helps schools organize and manage schedules for individual teachers. This guide explains how to effectively use this section.
Viewing and Managing Teacher Timetable
- Navigate to the Timetable Section:
- From the dashboard, click on the “Timetable” tab.
- Select “Institution Timetable (Teacher-Wise)” from the options available.
- Select Teacher:
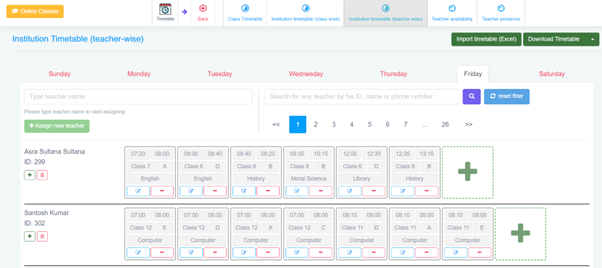
- Use the search bar to type the name, ID, or phone number of the teacher whose timetable you want to view.
- Click on the “Search” icon to load the timetable.
Adding and Editing Timetable Entries
- Adding a New Timetable Entry:
- To add a new class for a teacher, click on the green “+” button located in the time slot where you want to add the new class.
- A new dialog box will appear where you can fill in details such as class, section, subject, and time.
- Editing Existing Entries:
- To edit an existing entry, click on the blue pencil icon located within the time slot you wish to edit.
- Make the necessary changes in the dialog box and save your changes.
- Deleting Entries:
- To delete an entry, click on the red minus icon within the time slot you want to remove.
- Confirm the deletion when prompted.
Managing Breaks
- Adding Breaks:
- Breaks can be added by clicking on the “+” icon next to the day name (e.g., “Monday”).
- Specify the start and end time of the break and save.
- Deleting Breaks:
- To delete a break, click on the red minus icon next to the break time.
- Confirm the deletion when prompted.
Importing and Exporting Timetables
- Importing Timetable:
- To import a timetable from an external file, click on the “Import Timetable (Excel)” button.
- Choose the file from your computer and upload it. The timetable will be populated based on the data in the file.
- Exporting Timetable:
- To export the current timetable, click on the “Download Timetable” button. You can choose to export the timetable in Excel format.
- This feature allows you to save and print the timetable for offline use.
Assigning New Teachers
- Assigning a New Teacher:
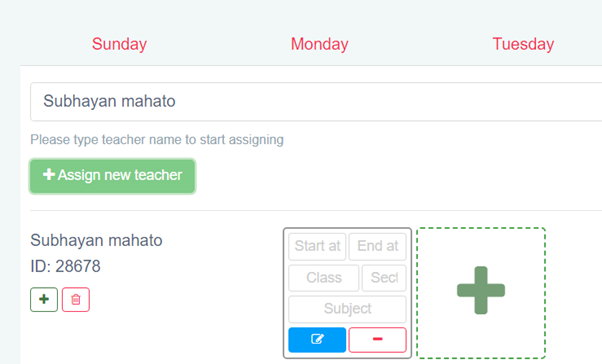
- To assign a new teacher, click on the green “Assign New Teacher” button.
- Type the name of the teacher in the search bar and select from the dropdown list that appears.
- The teacher’s details will be added, and you can proceed to assign their timetable as needed.
The Institution Timetable (Teacher-Wise) management feature provides a comprehensive solution for schools to organize their teachers’ schedules efficiently. By allowing easy viewing, editing, importing, and exporting of timetables, schools can ensure a smooth and well-structured timetable for all teachers.
This feature aims to streamline the scheduling process, making it easier for administrators to manage teacher schedules and ensure that both students and teachers are aware of their daily activities.
Teacher Availability Management
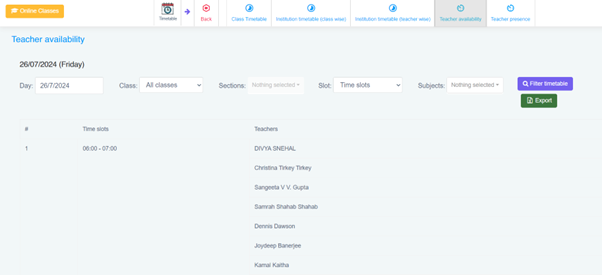
The Teacher Availability feature allows administrators to view and manage the availability of teachers on a specific day and time. This helps in efficient scheduling and ensuring that all classes are adequately staffed.
Viewing Teacher Availability
- Navigate to the Teacher Availability Section:
- From the dashboard, click on the “Timetable” tab.
- Select “Teacher availability” from the options available.
- Set the Date:
- Select the desired date using the date picker. The default date is set to the current day.
- Filter by Class and Section:
- Use the dropdown menus to filter the availability by specific class and section if needed. This helps in narrowing down the list to relevant teachers.
- You can also filter by specific subjects or time slots using the respective dropdown menus.
- Viewing Available Teachers:
- The list of available teachers for the selected date and time slot will be displayed. You can see the time slots and the corresponding teachers available during those times.
Exporting Availability Data
- Export Timetable:
- Click on the “Export” button to download the availability data in Excel format. This is useful for record-keeping and offline review.
The Teacher Availability feature provides a convenient way to manage and view the availability of teachers for specific dates and times. By using filters, administrators can quickly find which teachers are available for particular classes or subjects, facilitating better scheduling and resource allocation. The export function ensures that this information can be easily shared or kept for future reference.
Teacher Presence Management
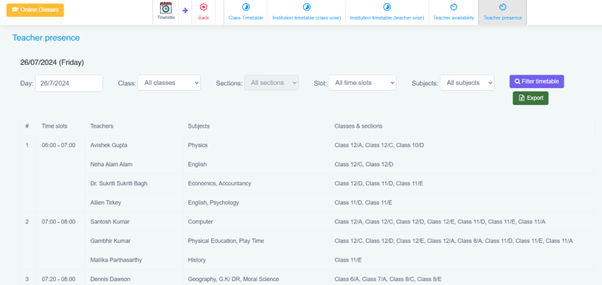
The Teacher Presence feature allows administrators to view and manage the presence of teachers for specific days and time slots. This helps in ensuring that all classes are conducted as per schedule and any absenteeism is accounted for.
Viewing Teacher Presence
- Navigate to the Teacher Presence Section:
- From the dashboard, click on the “Timetable” tab.
- Select “Teacher presence” from the options available.
- Set the Date:
- Select the desired date using the date picker. The default date is set to the current day.
- Filter by Class, Section, and Subjects:
- Use the dropdown menus to filter the presence by specific class, section, and subjects if needed. This helps in narrowing down the list to relevant teachers.
- You can also filter by specific time slots using the respective dropdown menus.
- Viewing Teacher Presence:
- The list of teachers present for the selected date and time slot will be displayed. You can see the time slots, teachers, subjects, and the classes & sections they are assigned to during those times.
Exporting Presence Data
- Export Timetable:
- Click on the “Export” button to download the presence data in Excel format. This is useful for record-keeping and offline review.
The Teacher Presence feature provides a convenient way to manage and view the presence of teachers for specific dates and times. By using filters, administrators can quickly find which teachers are present for particular classes or subjects, facilitating better scheduling and ensuring that all classes are adequately staffed. The export function ensures that this information can be easily shared or kept for future reference.
Managing Academic Years in the CuteBrains System
In the CuteBrains system, managing academic years is a crucial administrative function that helps organize and maintain the chronological order of student records, class schedules, fee collections, and more. This section provides a detailed guide on how to view, manage, and create academic years within the system. The academic years are displayed in a list format, allowing administrators to easily access past, current, and future academic year data. Each academic year can be edited, set as the default, or deleted if necessary. Additionally, new academic years can be added to the system with ease. Let’s delve into the step-by-step process of managing academic years in the CuteBrains system.
Viewing and Managing Academic Years
List of Academic Years
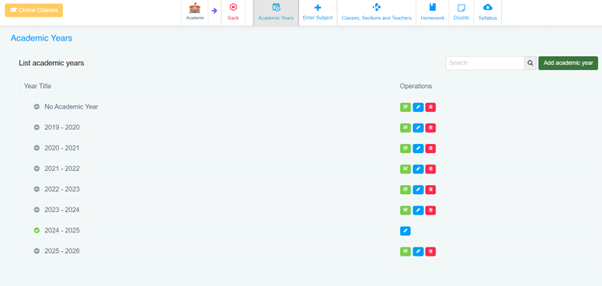
When you navigate to the “Academic Years” section in CuteBrains, you will see a list of all the academic years that have been set up in the system. The list includes:
- No Academic Year: This option is typically used when no specific academic year is assigned to a particular record or event.
- 2019 – 2020: Represents the academic year starting in 2019 and ending in 2020.
- 2020 – 2021: Represents the academic year starting in 2020 and ending in 2021.
- 2021 – 2022: Represents the academic year starting in 2021 and ending in 2022.
- 2022 – 2023: Represents the academic year starting in 2022 and ending in 2023.
- 2023 – 2024: Represents the academic year starting in 2023 and ending in 2024.
- 2024 – 2025: Represents the academic year starting in 2024 and ending in 2025.
- 2025 – 2026: Represents the academic year starting in 2025 and ending in 2026.
Each academic year is displayed with its title and a set of operation buttons that allow you to perform various actions.
Operations
The operations available for each academic year include:
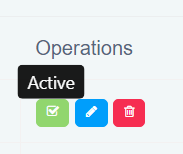
- Activate (Set as Default):
- Icon: Green checkmark
- Function: This button allows you to set an academic year as the default. When you mark an academic year as the default, it becomes the active academic year for all operations within the system. This is particularly important for ensuring that new records, events, and transactions are automatically associated with the correct academic year.
- Edit:
- Icon: Blue pencil
- Function: The edit function allows you to modify the details of an existing academic year. This can include changing the year title or any other specific details that may be relevant. Editing is crucial when correcting errors or updating information to reflect new decisions or changes in the school’s academic calendar.
- Delete:
- Icon: Red trash can
- Function: The delete function allows you to remove an academic year from the system. This is an irreversible action and should be done with caution. Deleting an academic year will remove all associated data, so it is typically only done when there is a duplicate entry or an erroneous record.
Creating a New Academic Year
Creating a new academic year is a straightforward process in CuteBrains. This function is essential at the beginning of a new academic cycle to ensure that all school operations are organized according to the correct calendar year.
Steps to Create a New Academic Year
- Navigate to the “Add Academic Year” Section:
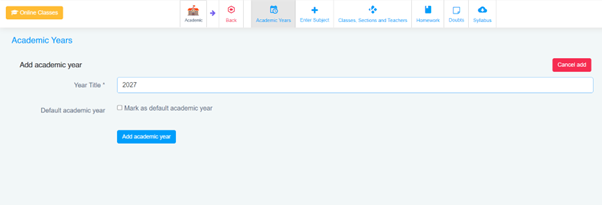
- To create a new academic year, click on the “Add Academic Year” button on the right side of the “Academic Years” page.
- Enter Year Title:
- In the “Year Title” field, enter the title for the new academic year. This should follow the format of “YYYY – YYYY,” indicating the start and end years of the academic period. For example, if you are adding the academic year for 2027, you would enter “2027 – 2028.”
- Set as Default Academic Year (Optional):
- If this new academic year will be the active academic year, check the box labeled “Mark as default academic year.” This action ensures that all new entries in the system will default to this academic year unless specified otherwise.
- Add Academic Year:
- Once you have filled in the necessary details, click the “Add Academic Year” button to save the new year to the system. This new academic year will now appear in the list alongside the other years, with options to set as default, edit, or delete.
Importance of Managing Academic Years
Proper management of academic years is vital for several reasons:
- Organization of Records: Academic years help categorize and organize all records, including student information, attendance, grades, and fee collections. This organization simplifies data retrieval and analysis.
- Consistency in Operations: By setting a default academic year, the system ensures that all new data entries, events, and transactions are consistently attributed to the correct academic year. This consistency prevents errors and misalignments in records.
- Planning and Forecasting: Having a well-maintained record of past academic years allows the administration to review historical data, assess trends, and make informed decisions for future planning.
- Compliance and Reporting: Many educational institutions are required to maintain accurate records of academic years for compliance with educational regulations and standards. Properly managed academic years facilitate accurate reporting and compliance.
Editing and Deleting Academic Years
While adding new academic years is a regular activity, there may be instances where you need to edit or delete existing academic years. For example, if there was a mistake in the year title or if an academic year is no longer relevant due to changes in the academic calendar.
Editing an Academic Year
To edit an academic year:
- Click on the blue pencil icon next to the academic year you wish to edit.
- Update the necessary details in the form that appears.
- Click “Save” to apply the changes.
Deleting an Academic Year
To delete an academic year:
- Click on the red trash can icon next to the academic year you want to remove.
- Confirm the deletion in the prompt that appears. Be cautious, as this action is irreversible.
Managing academic years in the CuteBrains system is a fundamental task that ensures the smooth operation of the school’s administrative processes. From organizing student records to planning academic schedules, the correct setup of academic years plays a critical role in the school’s overall functionality. By following the steps outlined in this guide, administrators can efficiently manage academic years, ensuring consistency and accuracy across the system. Whether you’re adding a new academic year, setting a default year, or editing existing records, these operations help maintain a well-organized and efficient academic environment.
